How to add a feedback widget to your Docusaurus documentation
Docusaurus makes it easy to build fast, well-structured documentation. But once your docs are live, you face the same problem every documentation team faces: you don't know which pages are actually helping users and which ones are quietly causing confusion.
Generic surveys help, but they pull users away from the context where the confusion happened. In-page feedback, attached to the exact page the user is reading, gives you signal that's tied to content rather than memory.
This guide walks through adding a feedback widget to your Docusaurus site using the official PushFeedback plugin, configuring it for your needs, and connecting it to the dashboard so you can start acting on what users tell you.
Why in-context feedback matters for Docusaurus docs
When a user gets stuck on your API reference and can't figure out an authentication parameter, they won't come back later to fill out a survey. They'll either contact support, search elsewhere, or give up.
In-context feedback catches that moment. A widget embedded on the page lets users leave a comment, a rating, or a screenshot while the problem is in front of them. You get specific information ("step 3 is missing the required scope parameter") instead of vague impressions ("docs are confusing").
For technical documentation in particular, this specificity matters:
- Outdated code samples are one of the most common complaints in developer docs. A comment pinned to a specific page tells you exactly which sample broke.
- Missing explanations are invisible from analytics. Page views don't tell you someone left because they couldn't find what they needed.
- Tutorial failures happen at specific steps. Feedback tied to the page surface which step people abandon at.
Surveys and NPS scores can complement this, but they can't replace the page-level specificity that an embedded widget provides.
Prerequisites
Before you start, you need:
- A PushFeedback account (free to start)
- A project created in the PushFeedback dashboard
- A Docusaurus 2.x or 3.x site with Node.js installed
To create a project, log in to your dashboard, click New project, and copy the project ID. You'll use it in the configuration step.
Step 1: Install the plugin
Run the following in your Docusaurus project directory:
For Docusaurus 3.x:
npm install docusaurus-pushfeedbackFor Docusaurus 2.x:
npm install docusaurus-pushfeedback@0.1.7Step 2: Add the plugin to your config
Open docusaurus.config.js and add the plugin to your plugins array:
plugins: [
  [
    'docusaurus-pushfeedback',
    {
      project: '<YOUR_PROJECT_ID>',
    },
  ],
],
Replace <YOUR_PROJECT_ID> with the ID from your PushFeedback dashboard.
Start your site with npm start and confirm the feedback button appears. By default it renders as a floating button on the right side of the page.
Step 3: Configure placement and style
The default configuration works, but you'll likely want to adjust placement and appearance to fit your site.
Button position
The buttonPosition option controls where the floating button sits:
| Value | Placement |
|---|---|
default | No fixed positioning (inline) |
bottom-right | Fixed to bottom-right of viewport |
center-right | Fixed to middle of right edge |
For most documentation sites, center-right keeps the button visible without overlapping content at the bottom of long pages.
Modal position
The modalPosition option controls where the feedback form opens. Common choices for docs:
sidebar-right: Opens a panel on the right. Less disruptive for users mid-reading.center: Opens a centered overlay. Higher visual weight, better for shorter pages.
Button style
Use buttonStyle: 'dark' on light-themed sites or buttonStyle: 'light' on dark-themed sites to maintain contrast.
A full configuration example:
plugins: [
[
'docusaurus-pushfeedback',
{
project: '<YOUR_PROJECT_ID>',
buttonPosition: 'center-right',
modalPosition: 'sidebar-right',
buttonStyle: 'dark',
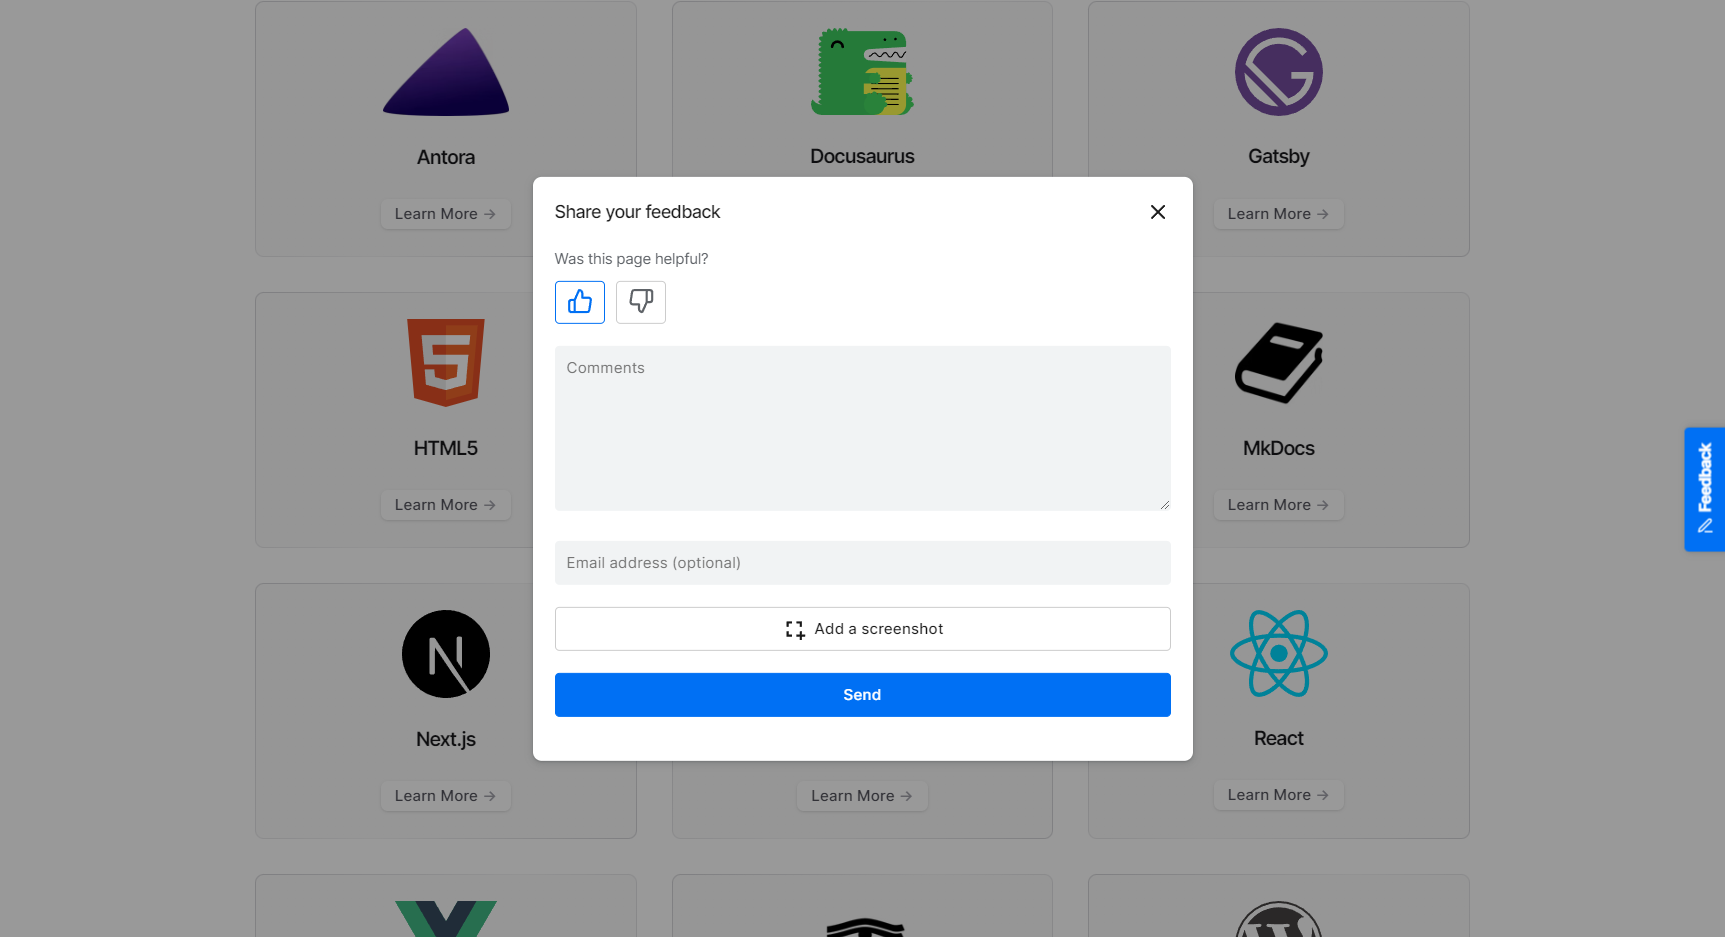
modalTitle: 'Was this page helpful?',
},
],
],Custom CSS
To match your Docusaurus color scheme more precisely, create src/css/custom.css (or add to an existing one) and override the widget's primary color:
:root {
  --feedback-primary-color: #2e8555; /* Replace with your brand color */
}
Then reference it in your Docusaurus config under theme.customCss.
Step 4: Adjust feedback types
By default, the widget includes a rating input (thumbs up/down), a comments field, an email field, and a screenshot button. You can hide or adjust any of these.
For documentation feedback, a common setup is:
- Keep the rating and comments (core signal)
- Keep the screenshot button (especially useful for catching broken code or confusing diagrams)
- Make email optional (required email fields reduce completion rates significantly)
To switch to a star rating instead of thumbs:
plugins: [
  [
    'docusaurus-pushfeedback',
    {
      project: '<YOUR_PROJECT_ID>',
      ratingMode: 'stars',
    },
  ],
],
Stars work well when you want to track helpfulness on a gradient. Thumbs work well when you just want a clean positive/negative split for triage.
Step 5: View submissions in the dashboard
Once your widget is live and users start submitting, every submission appears in your PushFeedback dashboard. Each entry includes:
- The page URL where the feedback was submitted
- The rating the user selected
- Their comment
- A screenshot, if they attached one
- A timestamp
The dashboard groups submissions by project, so if you have multiple Docusaurus sites, you can track them separately. The page URL attached to each submission is how you map feedback back to specific pages.
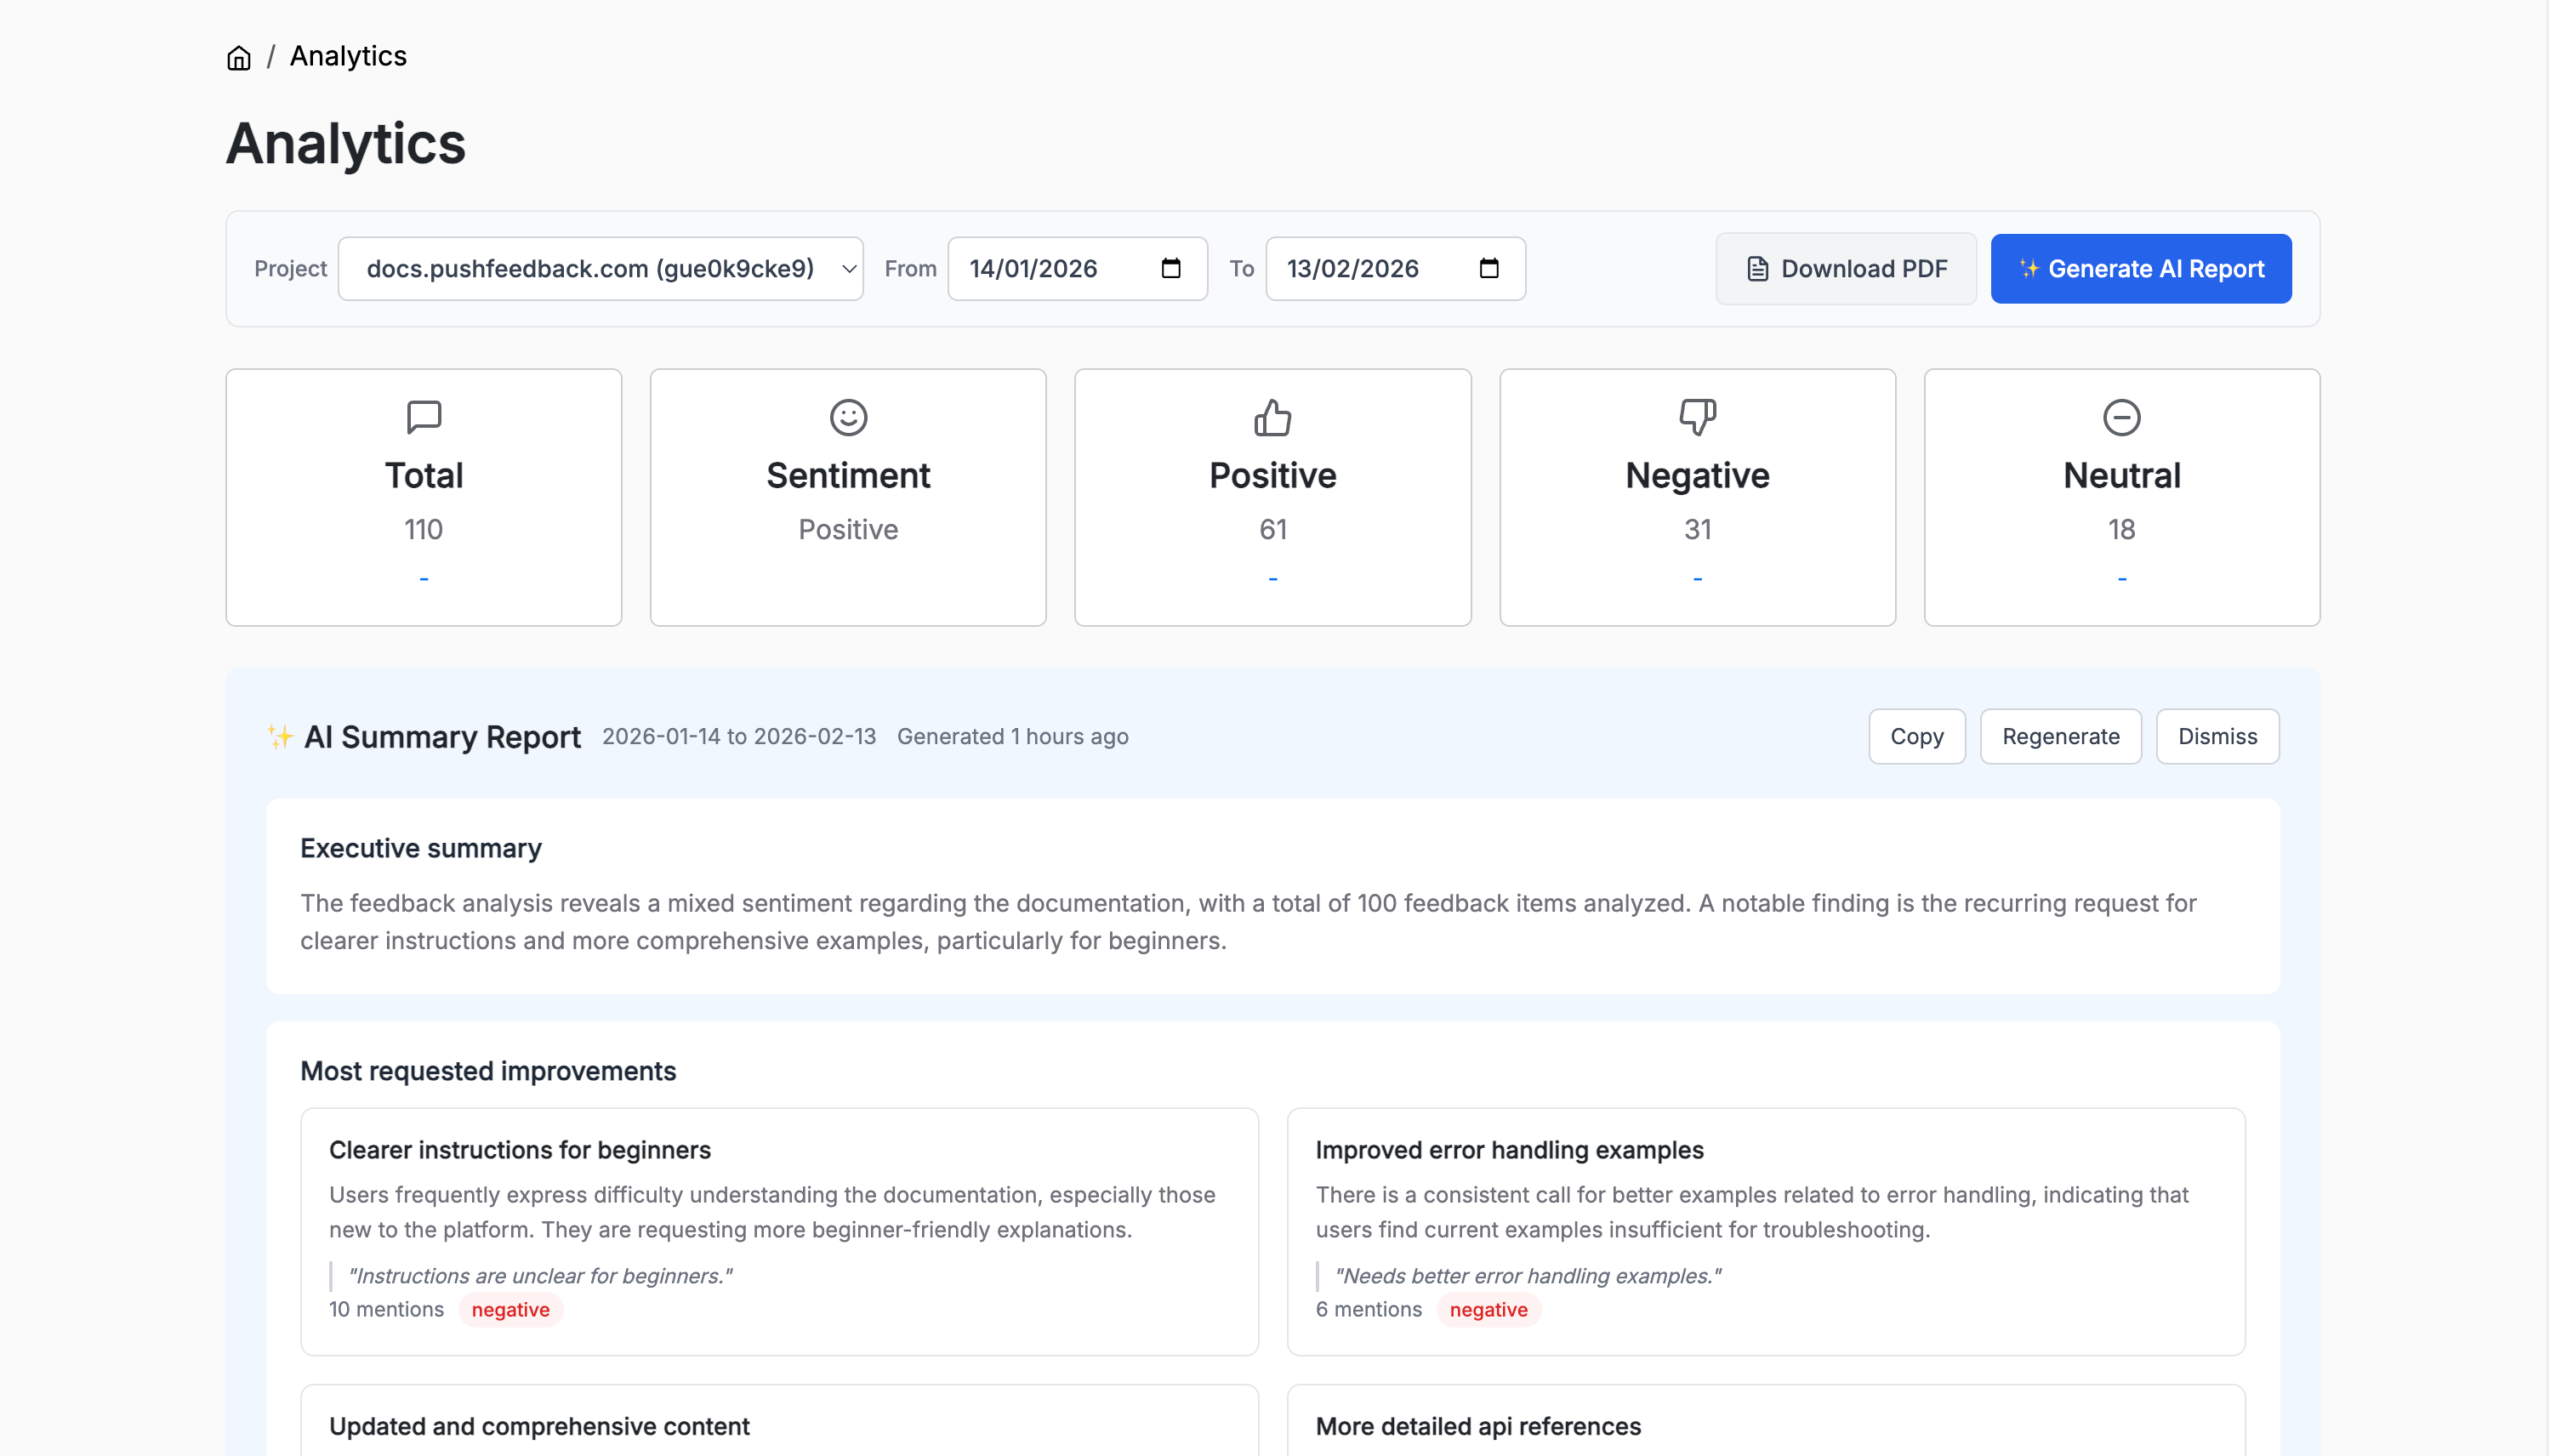
Step 6: Enable AI reports
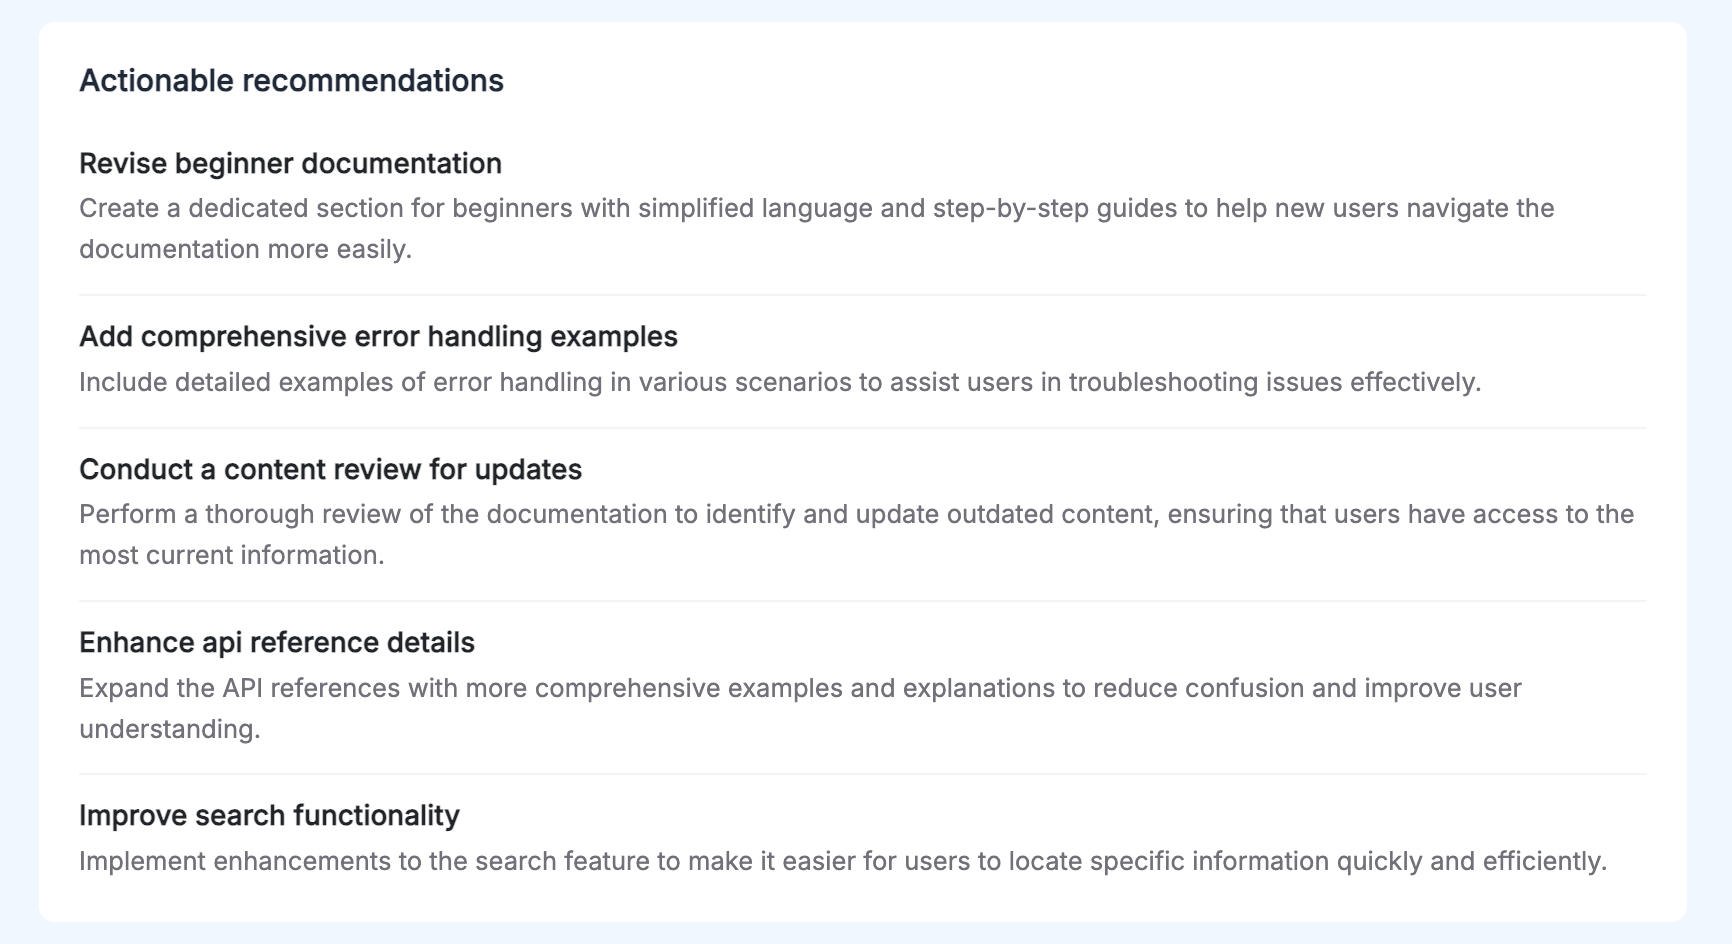
When you have enough feedback volume, manual review becomes slow. PushFeedback's AI reports analyze your submissions and produce a structured summary:
- An executive overview of sentiment and volume
- The most frequently mentioned themes (with representative quotes)
- Specific recommendations for what to fix
To generate a report, open your project in the dashboard and click Generate AI report. The report runs against all submissions in the current date range. You can run it after a documentation update to see if sentiment shifted.
This is particularly useful after shipping a new version of your docs: run a report before and after to measure whether the changes addressed the feedback patterns.
Tips for higher response rates
The baseline response rate for documentation feedback widgets is low. Most users who had a good experience won't stop to say so, and users who had a bad experience often leave without saying anything either.
A few things that consistently improve response rates:
Place the button where frustration happens. The end of a long tutorial or the bottom of a reference page is where users either succeed or give up. A center-right button is always visible, but you can also embed an inline thumbs-up/down block at the bottom of each doc page using the swizzle approach in the PushFeedback docs.
Use a specific modal title. "Was this page helpful?" outperforms "Share your feedback" because it sets a clear, low-effort expectation. Users know what they're being asked.
Keep it short. Every additional required field reduces submissions. The modal's default configuration asks for a rating and an optional comment. That's the right balance for most docs sites.
Don't require email. Optional email fields get filled in by users who want a follow-up. Required email fields lose users who just want to say something quickly.
Review feedback on a schedule. Feedback left unread doesn't improve docs. Block 30 minutes per week to go through new submissions. If you're using AI reports, run one at the start of each sprint to inform what gets fixed.
What to do with the data
Collecting feedback is only useful if you act on it. Once you have a backlog of submissions, the pattern that matters most is not individual comments but which pages generate the most negative ratings.
Sort by page URL and look for clusters. A single page with 15 negative ratings is more actionable than 15 pages with one each. Fix the clusters first.
For pages with negative ratings but no comments, look at the screenshot if one was attached. Often the screenshot shows exactly what the user was confused about, even when they didn't describe it.
For pages with specific comments, treat each one as a bug report: something about that page didn't work for that user, and it probably didn't work for others who didn't bother submitting.
Getting started
Adding PushFeedback to a Docusaurus site takes about 10 minutes. You install a package, add three lines to your config, and you're collecting feedback on every page.
The harder part is building the habit of reviewing and acting on what users tell you. Start with a weekly review, fix the pages with the most negative ratings, and measure whether sentiment improves. That loop, collect, fix, measure, is what separates documentation that gets better over time from documentation that just gets older.
If you're ready to set it up, the PushFeedback docs have the full installation reference including the advanced swizzle setup for inline like/dislike buttons. If you want to go deeper on turning that data into action, the complete guide to collecting and analyzing documentation feedback covers the full workflow from collection through analysis.